
Home > Products > TMPGEnc Authoring Works 4 > Tutorials > DVD Creation: DVD-Video Output
Tutorials
Tutorials
DVD Creation
Adding Subtitles
Transition Effects
Menu Creation
Title Sequences
DVD Creation

Output
Outputting and Writing Your DVD-Video
This is the last stage. This is where we will output the project to the DVD-Video format and write (burn) to DVD disc.
Let's explore the options available on the Output screen.
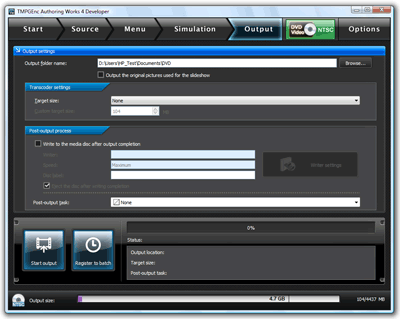
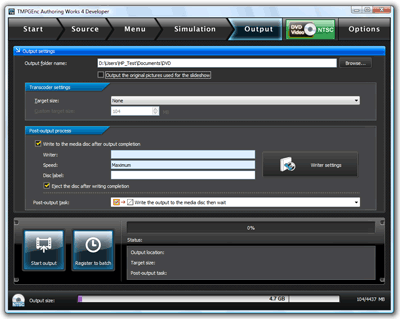
The Output Screen
|
1. Output Folder Name 2. Transcoder Settings 3. Post-Output Process 4. Writer Settings |
1. Output Folder Name

Before being able to burn your project to DVD, the program first needs to render and output your clips into the DVD-Video format onto your computer's hard drive. Here, you can select the output location and set the folder name for your project.
2. Transcoder Settings

Sometimes your content will be bigger than the size of a DVD disc's capacity. The transcode settings will tell the program what the final output size of the project should be. You can select from a number of options depending on the project's format. Since we are making a DVD, the following options are available to us.
For DVD-Video Mode:
- None (Transcoding will not be done.)
- Single Layer DVD Media (4.7 GB)
- Dual Layer DVD Media (8.5 GB)
- Custom Target Size (Use target size setting)
3. Post-Output Settings
In this tutorial, we will write to DVD after our DVD-Video files are outputted. To do so, we'll need to do the following steps:
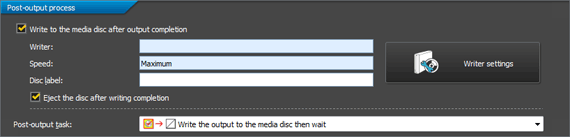
1. Check the box next to "Write to the media disc after output completion."
2. Click on "Writer Settings" to set our writing drive.
4. Writer Settings
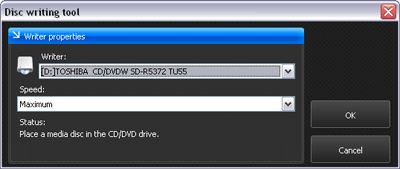

|
1. Set your writing drive and speed by clicking on the downward arrow to select from the available options. 2. Insert a blank DVD into your selected drive and click "OK". |
Start Output

|
Now that your writing settings are set, click on the "Start output" button to begin the output process. |
The Output Screen
Once you click "Start output", the project will be encoded in the DVD-Video format to the folder specified, and then written with the drive you selected. The screen below is what you will see while this process is occurring.
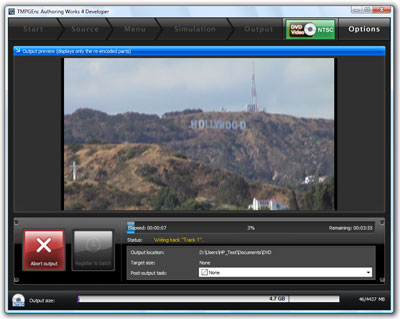
|
1. This is the preview area that will show what is currently being processed. 2. The "Start output" button will change to "Abort output." Click to abort the output process. 3. Progress Bar |
*If you click "Abort output" while the files are being written to the DVD media, the process will be aborted and cannot be started from where you left off.
However, the DVD-Video files outputted to the folder you specified will still be available to use to write the project to DVD.
